Showing posts with label Holiday Sparkle Countdown. Show all posts

Wednesday, October 13, 2010

Holiday Sparkle Day 5

Hello peeps!! It's already day five and we are now winding down sneak peeks for the full reveal.  I don't know what I like better...the peeks or the full reveal.  Or should I say...when the stamp set is finally in my hands so I can create with it too.  Thank you so much for joining me for this release.  I enjoy your company and your comments too.

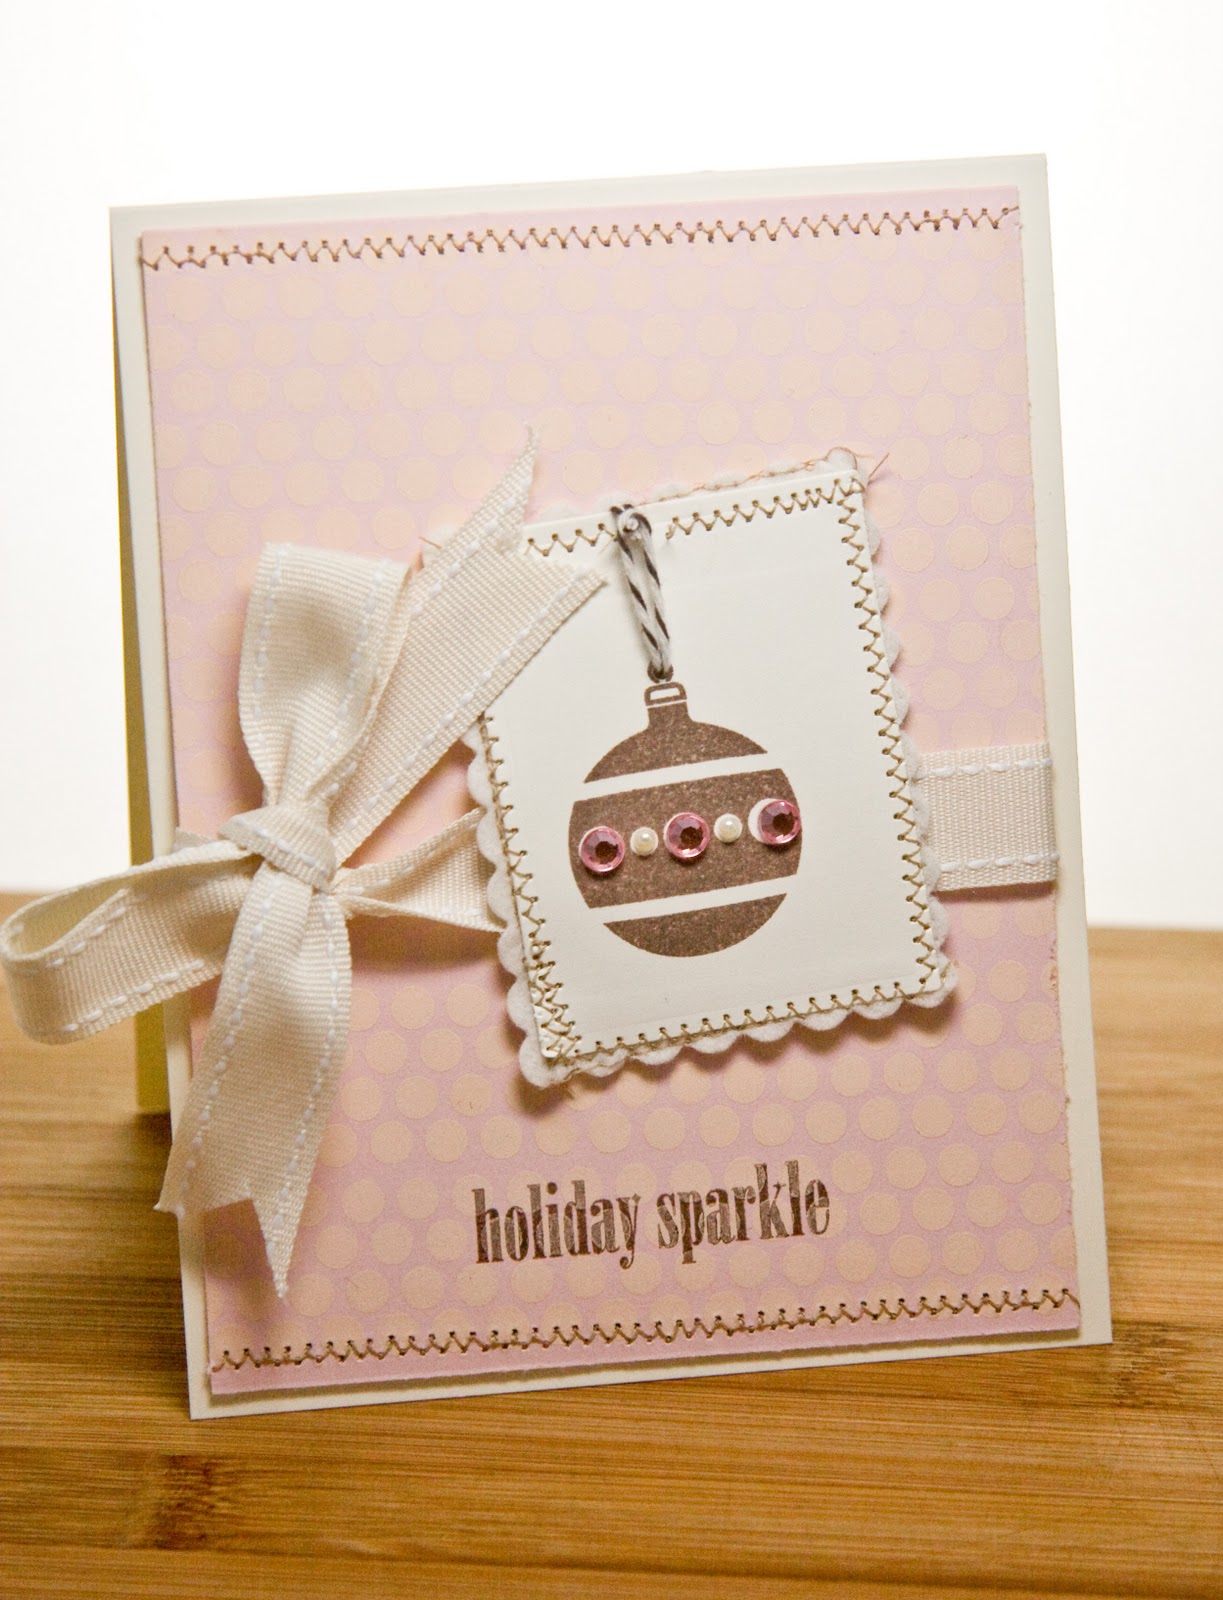
Today's first project is a gift card holder created with felt, stitching and square nestabilities!!  Yes, it is that simple. Begin by creating 2 die cut squares, stitch your image (which I have coloured and also stamped a sentiment) to the top piece of the felt.  Then stitch the two pieces together.  Then thread buttons onto felt.  As a final step, apply rhinestones.


INSTRUCTIONS

GIFT CARD HOLDER
  1. Create felt dies.
  2. Stamp image, colour and stamp sentiment.
  3. Stitch the image to the felt.  Then stitch the two felt squares together.
  4. Stitch buttons to felt.
  5. Colour and apply rhinestone.
SUPPLIES
Stamp Set(s):  Holiday Sparkle by PTI available October 15th
Cardstock: Vintage Cream by PTI
Ink: Dark Chocolate by PTI
Accent: Clear Rhinestones, Baker's Twine by PTI
Tools: Sewing Machine, Copic: E55, E59, E79, W1, 0, R89

My second project is an out of the box card.  I used the focal image and turned it into a fall card.  I am pleased with how it turned out


 INSTRUCTIONS

CARD
  1. Create card base and cut layers
  2. Stamp images and sentiment.
  3. Apply rhinestones.
  4. Adhere all layers
SUPPLIES
Stamp Set(s):  Holiday Sparkle by PTI available October 15th, dotted line from Holiday Button Bits, leaf image and sentiment from Falling Leaves by PTI
Cardstock: Vintage Cream by PTI, Orange Zest by PTI, Dark Chocolate by PTI
Ink: Dark Chocolate by PTI, Orange Zest by PTI, Pure Poppy by PTI, Spring Moss by PTI
Accent: Clear Rhinestones

Thanks again for stopping by!  I would love to hear from you today and look forward to catching up with you later tonight in the forums! 

Have a super Thursday.

Hugs;
Alli

Tuesday, October 12, 2010

Holiday Sparkle Day 4

Hello friends!  Here we are on day four already.  One blink...two blinks and jump ahead here we are!  I am very excited to share some new cards with you today.  I am LOVING the bling and the pearls and while I illustrated this set I never imagined being able to use finally use all these fabulous things I have been hoarding on all my cards.  Watch out because I am ready to dazzle and pizzazz this holiday season.

My first card was create for that soft feminine person in your life.  We all have one.  The woman whose personality is warm and fuzzy.  I made sure to create a palette of warm colours and added some felt and ribbon to give my card some extra warmth.  Not only that I added some pearls and stitching for that cozy feeling.  Are you feeling it yet???


INSTRUCTIONS


CARD #1
  1. Create card base and cut layers.
  2. Create die cut felt and paper.
  3. Stamp image and background images.  Stamp sentiment.
  4. Stitch.
  5. Apply rhinestone, and pearls.
  6. Attach ribbon and thread.
  7. Adhere all layers
SUPPLIES

Stamp Set(s):  Holiday Sparkle by PTI available October 15th, Polka Dot Basics II by PTI
Cardstock: Vintage Cream by PTI,  PTI, Sweet Blush by PTI,
Ink: Dark Chocolate by PTI, VersaMark by Tsukineko
Accent: Pink Rhinestones, Pearls, Ribbon by PTI, Baker's Twine by PTI
Tools: Sewing Machine
My second card was just as fun to create as the first one because I FINALLY get to show you the paisley.  I love paisley and couldn't wait to add it to one of my collections.  The paisley will look super cute decorated in pearls or rhinestones too.  But for this card I used it as a background stamp.


 INSTRUCTIONS

CARD#2
  1. Create card base.
  2. Cut layers, and scalloped edge
  3. Stamp image and background images.  Stamp sentiment.
  4. Apply rhinestone, threaded button and pearls.
  5. Attach ribbon.
  6. Adhere all layers
SUPPLIES

Stamp Set(s):  Holiday Sparkle by PTI available October 15th
Cardstock: Vintage Cream by PTI,  PTI, Simply Chartreuse by PTI, Sweet Blush by PTI,
Ink: Dark Chocolate by PTI, VersaMark by Tsukineko
Accent: Pink Rhinestones, Pearls, Ribbon by PTI, Baker's Twine by PTI
Tools: Scallop Punch by EK Success

Thanks again for stopping by!  Don't forget to leave me a comment today so I know you have been here! I'll see you back for the last revels of the Holiday Sparkle before it's up for purchase on Oct 15th!!! 

Have a super day.

Hugs;
Alli

Monday, October 11, 2010

Holiday Sparkle Day 3

Welcome to day 3! We are at the half way mark and I am sure you are eagerly counting down to the 15th by now.  I just wanted to thank everyone of you who left me a comment. It's always nice to get happy mail.  As many of you know we just finished celebrating Thanksgiving in Canada so all that turkey and the turkey leftovers have really put my in the festive mood! 

My first project for today is a decorative mini box.  I love these pillow boxes because they are easy to make and they are a perfect place to store small gifts and treats.  You can find many different templates online or go HERE to print yours.


INSTRUCTIONS
Gift Pillow Box
  1. Print outline on cardstock and use a stylus to create folds.
  2. Cut layers and punch scallop edge.
  3. Stamp image.  Apply rhinestones (colour using RV19) and stamp sentiment.
  4. Attach ribbon and twine.  Attach threaded button.
  5. Adhere all layers
SUPPLIES

Stamp Set(s):  Holiday Sparkle by PTI available October 15th,
Cardstock: Stamper's Select White by PTI, Garden Green by PTI, Raspberry Fizz by PTI
Ink: True Black by PTI, Garden Green by PTI
Accent: Clear Rhinestones, Ribbon by PTI, Baker's Twine by PTI, misc wood button
Tools: Copic Marker: RV19, W1, Scalloped Punch by EK Success

For my second project I created a masculine holiday card since I send out cards to all my husband's coworkers including the single guys (normally I can make the other cards a little more feminine...but can't get away with that for the single guys LOL). This card and colour combo is the perfect touch: simple and not over the top.


INSTRUCTIONS
CARD
  1. Create card base.
  2. Cut layers, scallop circle and other circles.
  3. Stamp image and background.  Punch using die cut.  Apply rhinestones.
  4. Stamp sentiment.
  5. Attach ribbon and folded circle with stapler.
  6. Attach thread.
  7. Adhere all layers
SUPPLIES

Stamp Set(s):  Holiday Sparkle by PTI available October 15th, Background Basics Retro by PTI,  Holiday Spirit Sentiments by PTI
Cardstock: Stamper's Select White by PTI, Garden Green by PTI, Aqua Mist by PTI, Pure Poppy by PTI, Kraft by PTI
Ink: True Black by PTI
Accent: Clear Rhinestones, Ribbon by PTI, Baker's Twine by PTI
Tools: Scalloped Circle and Circle Nestabilities by Spellbinders, Scalloped Punch by EK Success, Circle Punch by EK Success

Thanks again for stopping by!  Don't forget to leave me a comment today so I know you have been here! I'll see you back for day 4 of the Holiday Sparkle sneak peeks.

Alli

Sunday, October 10, 2010

Holiday Sparkle Day 2

Hello peeps!! I hope you are enjoying these previews.  If you didn't have a chance to see, Betsy and Nichole showcased Holiday Sparkle yesterday.  I always love seeing what others do with the stamp sets I create.  If you ever create something with one of my stamp sets PLEASE link me up.  I try my best to peruse the web but I certainly can't make it to every blog out there.

So here we are on day two and there is more sparkle in sight...  I have always been fond of reindeer so it was only a matter of time before I created one that could be used for my holiday cards.  The reindeer has no nose or eyes so you can add them by stamping circles, adding rhinestones or pearls or even drawing them.


INSTRUCTIONS
CARD #1
  1. Create card base and impress using die.
  2. Cut layers and punch scallop edge.
  3. Stamp image.  Colour and outline image. Stamp sentiment.
  4. Apply rhinestone.
  5. Attach ribbon
  6. Adhere all layers
SUPPLIES

Stamp Set(s):  Holiday Sparkle by PTI available October 15th,
Cardstock: Stamper's Select White by PTI, Spring Moss by PTI, Dark Chocolate by PTI, Pure Poppy by PTI
Ink: True Black by PTI, Dark Chocolate by PTI
Accent: Red Rhinestone, Ribbon by PTI
Tools: Picnic Plaid impression plate by PTI, Copic Markers: E00, E39, E59, W2, O

For the second card I decided to make an extra sparkly card!  Yup.  That is what I LOVE about this snowflake because you can make it sparkle to the max.


INSTRUCTIONS
CARD #2
  1. Create card base and impress using die.
  2. Cut layers and felt.
  3. Stamp image and sentiment.
  4. Apply rhinestones.
  5. Attach ribbon.
  6. Adhere all layers

SUPPLIES
 
Stamp Set(s):  Holiday Sparkle by PTI available October 15th,
Cardstock: Stamper's Select White by PTI, Spring Moss by PTI, Dark Chocolate by PTI, Pure Poppy by PTI
Ink: True Black by PTI, Dark Chocolate by PTI
Accent: Clear Rhinestones, True Black Felt by PTI, Ribbon by PTI
Tools: Polka Dot Basics 2 impression plate by PTI, Copic Marker: BG49 (to colour rhinestones)
 
Thanks again for stopping by!  I've said it before but I mean it...you truly are my inspiration.  Don't forget to leave me a comment today so I know you have been here! I'll see you back for day 3 of Holiday Sparkle previews.

Have a wonderful start of the week!!  And Happy Turkey (aka Thanksgiving) to all my Canadian visitors!!  

Alli

Saturday, October 9, 2010

Introducing Holiday Sparkle

Welcome to countdown week!! I am over the moon excited about sharing sneak peeks for the newest release from the Urban Design collection called Holiday Sparkle.  It is a collection of super fun images and sentiments that you can use to create sparkle in all of your holiday creations.   I can hardly wait to show you some of my creations.  Holiday Sparkle will be available through Papertrey Ink on Oct. 15th, 2010.


First up is a unique design that I created that will surely dazzle the eyes.  I have several uses for the image below so make sure to check back during the release to see how you can use this focal border for all of your holiday projects and designs.


I began with the focal image.  I stamped it using True Black and coloured it with a light blue copic marker.  I also outlined the image using a W2 copic marker.  I stamped the sentiment using hibiscus burst ink.  Then, I applied the pink gems!!


INSTRUCTIONS
CARD #1
  1. Create card base and impress using die.
  2. Cut layers and punch scallop.
  3. Stamp image.  Colour and outline image. 
  4. Stamp sentiment.
  5. Apply gems.
  6. Adhere all layers

SUPPLIES
Stamp Set(s):  Holiday Sparkle by PTI available October 15th,
Cardstock: Stamper's Select White by PTI, Spring Moss by PTI, True Black by PTI, Aqua mist by PTI
Ink: True Black by PTI, Hibiscus Burst by PTI
Accent: Gems
Tools: Woodgrain impression plate by PTI, Corner Chomper by We R Memory Makers

The second card was inspired by my tree at home.  We set up our tree either the last day of November or the first day of December.  I know that seems early for some people but truth be told the tree is down by December 26th.  What I love most about the tree is the soothing lights.  I love the twinkle and shimmer they give.  I love the glow and the warm feeling they create.  When I create this tree stamp I wanted a way to add dazzle and sparkle to each and every one of my projects so I left openings to add that extra touch!  

I began by creating my textured background using an impression plate.  Next I stamped my image and sentiment on separate pieces of paper and lightly edged the sides with a sponge and Dark Chocolate ink.  The I applied my gems and attached my ribbon.


INSTRUCTIONS
CARD #2
  1. Create card base and impress using die.
  2. Cut layers.
  3. Stamp image and sentiment.  Edge the paper with sponge and ink.
  4. Apply gems to tree.
  5. Attach ribbon and thread.
  6. Adhere all layers

SUPPLIES
Stamp Set(s):  Holiday Sparkle by PTI available October 15th, sentiment from Holiday Spirit Sentiments by PTI
Cardstock: Stamper's Select White by PTI, Spring Moss by PTI, Dark Chocolateby PTI
Ink: Dark Chooolate by PTI, Spring Moss by PTI
Accent: Gem, Ribbon by PTI
Tools: Picnic Plaid impression plate by PTI, Sponge
 
I'd love to hear which of these cards is your favourite. Thanks again for stopping by.  I'll see you back for Day 2 of the previews!

Alli