I took to heart the things you wanted to see today and I also stuck with some of the ones I was originally planning to share with you. I will definitely be making more things to share with you including a program, save the date card and much more. I will share those a few days after the release.
The general consensus for everyone is QUICK and EASY--These are the 5 steps or less cards.
CARD 1: First up is a thank you card. Using this simple layout you can be sure to mass produce these cards as thank yous by changing the colours to coordinate with your wedding colours and choosing one of many coordinate images from Wedding Day.

Step 1
I cut out a rectangle 3.5x2.5 in black and adhered a layer of aqua mist 3.25x2.25. I also cut out a .75 inch strip of spring moss.
Step 2
I stamped randomnly on the aqua mist using aqua mist ink to create a monochromatic look.
Step 3
I stamp on the satin ribbon and set aside to dry before adhering it to the strip of spring moss.
Step 4
Adhere all layers and decorate with an embelishment (paper flowers are nice, primas, a brad, the scalloped circle, the scalloped square, etc)
CARD 2: Next is a card that can be used for any occasion. Because I am working with Wedding Day, i decided this could be a perfect card for the new couple. You can personalize this card by adding the couples last name under Mr. and Mrs.

Step 1
I cut 3/4x4 inch strip of black cardstock and adhered it to the cardstock
Step 2
I stamped the circular flourish with a circle nestabilities die and punched out the centre using the 1 1/4 inch EK Success punch. Adhere.
Step 3
Stamp the sentiment Mr and Mrs
CARD 3: I just love flourishes and this was such a simple design too!

Step 1
I stamped the flourish circle image in the centre of the card.
Step 2
I stamped the square flourish image from the circle to the edge of the paper on both sides.
Step 3
I punched out a 1 1/4 inch circle, stamped my centre image and placed it in the centre of the circle using a pop dot.
Step 4
I stamped the sentiment Happily Ever After.
Designer Note: Turn it vertical and you have a watch!!!!
Card 4 I absolutely adore that the Wedding Day set is so versatile. With words like Love, Eternity, Happy Anniversary...just to name a few, this is so much more than just a wedding set.
I created an anniversary card, which could really be an all occasions card too.

Step 1
I stamped randomly over the entire surface of the paper using 3 different ink colours and two different sized flourishes.
Step 2
I stamped the square flourish on a strip of 3/4 inch paper and then stamped anniversary over top.
Step 3
I adhered .5 inch strip of black cardstock as well as a strip of scallops and 2 inch strip of white cardstock.
Step 4
I fasten prima flowers to the card using a brad.
My Challenge card
I was issued a challenge by one of my readers to make something other than a wedding or anniversary card. (Sorry for the poor lighting...I can't adjust this lighting in this card without the colours being WAY OFF so I left it untouched)

How about those numbers for adding special dates to your cards or tags?I love that you can personalize a card by adding an important date. This is perfect for birthday's, anniversaries, baby births, weddings, new years, Christmas and the winter holidays....oh the possibilities are endless. Note: Other stamp set used was Trajan Monogram Edition by PTI
I was also asked to share another wedding favour...

Here is a table number card (you could easily place the guests name in the centre for a place setting card too)

I saved the best for last today!!!
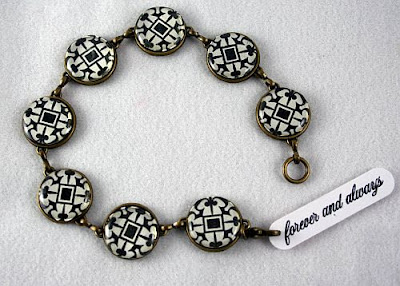
I created a personalized bracelet for the bride, bridesmaid, maid of honour etc... This is a
7 Gypsies antique brass naked bracelet I have had this in my collection for a while and it was Debbie Olson that recently inspired me to pull it out and use it once and for all! It was so simple to create...

Step 1
I stamped my images and then place the round pebble over top and cut around it.
Step 2
I adhered the back side of the stamped images and glued them to the round circles.
Step 3
I connected all of my designs together and fastened them with pliers.
Step 4
I stamped my sentiment and punched it out using the EK Success word window.
I'd love to hear what your fav project is today...also check out the post below for some exciting news.


24 comments:
Alli, these are ALL stunning! You are a great artist! Everything just took my breath away!
Sandy Kay
Wow, Wow, Wow. What a post. These are all great. Love your work and the stamp set.
Retired Heather
You are one talented individual.. Amazing projects and one lucky bride will win all this. Fabulous!!!
HOLY CRAP!!! And you say I make a lot! This are jaw dropping!Your new sets rocks and I hope you like what I got to do with it :D Only a few more hours.............Inky Hugs Alli!
WOW ~ FABULOUS! GORGEOUS!!!
These are all so gorgeous. I'm going crazy having to wait till midnight to order these stamps! That bracelet is stunning. Alli- you rock!
My Favorite is the bracelet! I love it! I am a jewelry maker also and so I love to see projects that combine my two hobbies! Great job on all of them ali!
You are so rockin' this Alli! I love the table number card. Sooooooo much better than those ugly big ole plain numbers they usually plop in the middle of the tables.
OH MY GOODNESS, Alli!! SOOOO many FABULOUS projects today!! I just love all the simple cards -- they're SO classy!! Girl, you outdid yourself with this post!
They're all so pretty but I do like that place card. It could have any sentiment in it and would still be perfect!
GREAT job!
Oh my gosh, Alli -- you are blowing me away with all your cards and projects! I love every detail!! That bracelet is fabulous! :)
They are all wonderful. But I especially loved the Mr. and Mrs. card and the bracelet. Adding a sentiment to the bracelet clasp was a GREAT idea. Love it!
oh, I'm such a fan of the black and white! That bracelet is stunning--I don't often wear jewelry because it's too frilly, but that is a piece I would actually try! I love the first card too--so very elegant--they're all lovely!
Absolutely fabulous! Your details are so wonderful and versatile. I love the flourish and each project reflects an under stated elegance. The baby card was also adorable. I am so excited with this set! I know I will use it for a lot of projects. Hope to share some with you!
I have just read your blog again and again. You are so ultimately creative and you stimulate us in so many ways. Thank you for sharing!!! Your detailed explanations are so great.
What gorgeous work, you are truly talented. I wish we had you as a resource a few years ago when our daughter married. Keep up the great work. TFS!
Sheila
Oh wow - I could never pick just one fave! Although that bracelet is to die for. Love it - love it!! I wish I was getting married so that I would qualify for the great package. Oh my goodness! Someone is going to be soooo thrilled and so blessed.
Awesome, awesome cards....beautifully done!
oooooooooooooooh I LOVE the 4th card. I really like the multi layers and stamped backrounds!!
Alli.....everything is SO pretty!! I will totally be using your layouts to create cards for other events such as birthday etc. I just can't wait till tonight to see all these sets in all their glory!! You rock!
Alli, I run out of words to use with you! Everything you do exudes creativity and class--you ROCK!
Wow! These are all FABULOUS! You are amazing! I love the bracelet and I especially love Card #3, but it's a decision I'd rather not make...I'll take them all! LOL! Thanks so much for your wonderful creativity!
How can we pick a favourite - they are all stunning!
PFFFT I can't pick out a favorite project - I love them all!!
Incredible.
*scarlet* on SCS
BEAUTIFUL beautiful beautiful! You have been busy. Love em all!
Post a Comment