Sunday, January 24, 2010

Stamp It! Cards issue


If you haven't already seen it on the stands, the new Stamp It! Cards magazine, a special edition from Paper Crafts, is now available and probably my FAVOURITE edition as of late!  I had the pleasure to participate in the "Stamp It! 3 Ways" feature using PTI's Everyday Button Bits where 3 designers were given the challenge of using the same stamp set to show you several different cards you can create using the same set (p.81).  I was featured alongside of Maren Benedict and Dawn McVey.  In addition, creative genius Erin Lincoln used my stamp set Shapes by Design to create a "Starbust" on p. 30.  I have to admit, seeing someone create a card using one of my sets and having it published is almost more exciting to me than having my own cards published LOL.  So if you ever get a card published using one of my sets PLEASE let me know which magazine/issue etc and I will happily go and buy it!

I choose the bicycle image from Everyday Button Bits and added a splash of colour.  My colour pallette was inspired from the trim at the bottom of the card in addition to the ribbon! 


Stamp Set(s):  Everyday Button Bits by PTI
Cardstock: Stamper's Select White by PTI
Patterned Paper: Gumdrop Sprinkles from Colorful Christmas Collection by MME
Ink: Dark Chocolate by PTI
Accents: Striped Ribbon by MME, Buttons by PTI

Tools: Copic Ciao markers, EK Success scallop punch, square nestabilities by Spellbinders

Hope you are having a terrific Sunday!  We are expecting company today and are looking forward to catching up with friends.

Alli

Wednesday, January 13, 2010

Daily Designs and Daily Designs Sentiments Day 5

Can you believe it's day 5 already?  I am really looking forward to seeing you all in the forums for the release party :) Nothing like good fast paced chatter and stamp set reveals to get one's heart pumping with excitment.  One of my favourite things about having a release is joining the forums and hearing about all the things you plan to purchase for the month. I know my own cart fills up with stamps, ink, paper and ribbon too.  And believe it or not you also have an influence over what I buy too LOL (especially after I see your beautiful creations).  Speaking of creations, if you plan to add Daily Designs and Daily Designs sentiments to your cart and then create something with them PLEASE send me a link.  I just love seeing your take on the sets.

Onto today's cards.  First up is for the princess in your life--and it doesn't have to simply be for the 6 year old, in fact I know a 29 year old princess too...and hey even I like to think I can sport the tiara from time to time.  My daughter is slowly transitioning from pink to purple so I thought I'd give the pink one last chance and created a pink number to share with you.

I began by stamping the scallop ring in true black.  Next I stamped the tiara in sweet blush.  I ended up double stamping the image to make it a little brighter.  Then I stamped the "sweet lil' princess" sentiment in raspberry frizz.  As a final touch to my circle I coloured it with my copic marker, added rhinestones for bling and punched it out using the circle nestabilities by Spellbinders.  You'll notice I also punched out a labels die cut and adhered the circle on with pop dots.  I layered my cardstock with October Afternoon patterned paper and added a big focal bow using the saddle stitch ribbon.
It's a simple card that speaks volumes.  I know my lil' princess will love it!


Stamp Set(s):  Daily Designs and Daily Designs Sentiments (Urban Design by Alli Miles) by PTI
Cardstock: Stamper's Select White by PTI
Patterned Paper: October Afternoon
Ink: True Black by PTI, Sweet Blush by PTI, Raspberry Fizz by PTI
Accents:Raspberry Fizz Saddle Stitched Ribbon by PTI
Tools: Copic Ciao markers, circle and labels nestabilities by Spellbinders

The second card is a simple thank you card.  I can't honestly have enough thank you cards...it seems I am always sending them out.  As a result I like to make a simple card so that it is mass produced.  I began by stamping my scallop circle in pure black and my "thanks" sentiment in pure black.  Then I outlined the "thanks" and coloured the inner circle with my copic markers.  Next I created two layers of patterned paper and cut a strip of ribbon.  Now keep in mind, if you plan to send out your card you could always 1) keep the ribbon flat or 2) replace the ribbon with a punched out border or strip of thin cardstock.  Each of those options provide a nice alternative to ribbon which can be bulky for mailout.  Personally I LOVE ribbon so it's hard for me to skip it.


Stamp Set(s):  Daily Designs and Daily Designs Sentiments (Urban Design by Alli Miles) by PTI
Cardstock: Stamper's Select White by PTI
Patterned Paper: Bo Bunny
Ink: True Black by PTI
Accents: Ribbon by Making Memories
Tools: Copic Ciao markers, circle nestabilities by Spellbinders

My final card might seem out of place during this "winter" season but then again, it's never too early to prepare for the future. I began by stamping my "x"/stitch circle using spring moss.  Then I stamped my pumpkin in orange zest and wiped off the stem and leaf with a baby wipe.  I coloured those my tombo marker.  Next I added my "harvest" sentiment using dark chocolate ink. Then I punched the circle image using the scallop square nestabilities.  I adhered it to a piece of scrap patterned paper, added a strip border and tied ribbon around it. As a final step, I stamped the base of the card using an image from Beyond Basic Borders using spring moss and adhered the focal image.


Stamp Set(s):  Daily Designs and Daily Designs Sentiments (Urban Design by Alli Miles) by PTI, Beyond Basic Borders by PTI
Cardstock: Stamper's Select White by PTI, Spring Moss by PTI, Orange Zest by PTI
Patterned Paper: Bo Bunny
Ink: Dark Chocolate by PTI, Spring Moss by PTI, Sweet Blush by PTI
Accents: Spring Moss Topnotch twill by PTI
Tools: Tombo marker (stem and leaf), scallop square nestabilities by Spellbinders

I hope you have enjoyed the countdown.  It has been a pleasure to create sneak peaks for you these past 5 days.  Before you leave today please let me know which is your favourite card from today's post.

Thank you again for all your wonderful comments.  See you in the forums!

Alli

Tuesday, January 12, 2010

Daily Designs and Daily Designs Sentiments Day 4

Welcome back!  Here we are, it's day 4 and I have 4 creations to share with you!  Again, I am working my best to show you images/sentiments you haven't already seen from both sets.

It has been such a delight to read your comments. Thank you so much for all who have left me a message in the past few days.  I had a few e-mails recently about subscribing to my blog.  If you don't use Google feeder I have added a few feed options for you in the sidebar.

First up today is a Mother's Day card.  If there is one thing I have learned since becoming a Mother is how special it is to receive a card of "thanks" for all that I do in the year.  It certainly makes me appreciate all that my mum went through with my brother and I (love you mum! and THANK YOU!!!)

To begin with I stamped my background circle stamp in spring moss.  You'll note the background stamp has a pretty leafy design on top and bottom as well as stitched line above and below the sentiment.  The sentiment was stamped in ripe avocado. "happy mother's day" is one stamp. Next I used the labels nestabilities to cut out my focal image.  I used a larger one to create an outline.  I applied a pearl bead to the leaves.
Then I stamped the spring moss cardstock using Polka Dot basic and snow cap ink.  I decided to stitch the outside edge.  Lastly, I adhered all the layers. 


Stamp Set(s):  Daily Designs and Daily Designs Sentiments (Urban Design by Alli Miles) by PTI , Polka Dot Basics by PTI
Cardstock: Stamper's Select White by PTI, Spring Moss by PTI
Patterned Paper: Bitty Dot Basics by PTI
Ink: Spring Moss by PTI, Ripe Avocado by PTI, snow cap by Ranger
Accents: Spring Moss Buttons by PTI, Swiss Dot Enchanted Evening Ribbon by PTI
Tools: Labels nestabilities by Spellbinders, sewing machine

There is something about spring that screams either pastels or bright fresh colours.  I decided to go with a little of both today but wanted to share the bright card first.  Long ago Nichole shared the beautiful boot from Green Thumb.  If you know me well you know I am a little nostalgic for the old days.  So much so that I can actually list EVERY person who was in my grade 7 class and even tell you what row they sat in...did I say nostalgic...well there might be another word for me BUT the truth is I hold onto the memories of the past with great strength.  When I was first introduced to PTI back into 2007 I was CRAZY for this set.  Although most of my cards using this set were never uploaded can check out my "Green Thumb" gallery (be nice now--that was 2007). So why the story?  Well as I was creating this set I thought how great would it be to "bring back the boot" so to speak.  But this time I changed it up and used the boot as a vase for tulips.  Seriously how fun is that?

To start, I stamped the boot image using spring moss.  I wiped the tulips and leaves with a baby wipe to remove excess colour.  Then I coloured each area with a tombo marker.  Next I stamped spring wishes using basic black and the "x" circle using basic black.  Then I punched the circle using the circle nestabilities from Spellbinders.  Next I stamped the spring moss cardstock with Polka Dot Basics and spring moss ink.  I cut 1/4 inch strips of paper in 3 colours and adhered them to the inside of my card and then cut off the excess spring moss to match up to the last strip (raspberry fizz).  As a final touch I added the gingham ribbon and adhered my circle.


Stamp Set(s):  Daily Designs and Daily Designs Sentiments (Urban Design by Alli Miles) by PTI, Polka Dot Basics by PTI
Cardstock: Stamper's Select White by PTI, Spring Moss by PTI, Raspberry Fizz by PTI, New Leaf by PTI, True Black by PTI
Ink: True Black by PTI, Spring Moss by PTI
Accents: Gingham by PTI
Tools: circle nestabilities by Spellbinders, Tombo Markers (pink, green, light green)


It's hard to believe but in a few short weeks all that valentine's day stuff will disappear off the shelves and fill up with baby chicks, easter bunnies and baskets.  Easter is in April this year...actually ONE day before my birthday.  I remember having my birthday fall on Sunday one year and wouldn't you know so did my birthday. I was so confused that year...I couldn't figure out if the easter bunny spoiled me or if my mum forgot my birthday LOL...
Today's card could be an Easter card or simply a card for a special cutie pie in your life.  I began by stamping my baby chick using sweet blush.  I wiped off the legs and coloured them with a Tombo marker.  I also coloured the eyes with a black marker and the beek with a marker too.  Then I stamped the "cutie pie" sentiment and traced over it with a light green marker.  I stamped the scallop circle and coloured the outer ring with a blue copic marker.  Next I stamped Polka Dot basics II using sweet blush.  Then I staped the spring moss using Damask Design with spring moss ink.  I used a scallop punch to pop a window for my focal image.  As a final step I used the corner rounder and added the ribbon.


Stamp Set(s):  Daily Designs and Daily Designs Sentiments (Urban Design by Alli Miles) by PTI, Damask Design by PTI, Polka Dot Basics II by PTI
Cardstock: Stamper's Select White by PTI, Spring Moss by PTI, Sweet Blush by PTI
Patterned Paper: Bitty Dot by PTI
Ink: True Black by PTI, Spring Moss by PTI, Sweet Blush by PTI
Accents: Misc Ribbon
Tools: Copic Ciao markers, Fiskars scallop punch, Corner Rounder by EK Success, Tombo marker

To me, Father's day is just as important as Mother's Day even though it's a day about dads.  I encourage my kiddos to give dad a handmade item every year.  I think my fav is the rock my son decorated at school that said "dad rocks".  It still sits on DH's bedside table.

My task was to create a simple card with masculine colours.  As you learned yesterday I often draw colour inspiration from the ribbon in my collection.  So when I looked through my stash I found some ribbon with some of these colours and decided to add one more.  I actually like how it turned out.

To begin, I stamped the "x" circle stamp in spring moss.  Then I stamped the "happy father's day" sentiment in ocean tides and the wrench in smokey shadow.  So that means I used 3 stamps to put my focal point together.  Then I punched it out using my circle nestabilities. I stamped the edge of my card with Polka Dot basics II and enchanted evening (that is why it stands out so much).  I also stamped the summer sunrise and spring moss using the same set.  Then I used the corner rounder and add some textured lines at the bottom of the card using my Scor-Pal.


Stamp Set(s):  Daily Designs and Daily Designs Sentiments (Urban Design by Alli Miles) by PTI, Polka Dot Basics II by PTI
Cardstock: Stamper's Select White by PTI, Spring Moss by PTI, Ocean Tides by PTI, Summer Sunrise by PTI, Enchanted Evening by PTI
Ink: Smokey Shadow by PTI, Spring Moss by PTI, Ocean Tides by PTI, Summer Sunrise by PTI,
Tools: Corner Rounder by EK Success, Scor-Pal, circle nestabilities by Spellbinders

Again, thank you SO MUCH for stopping by.  I hope to see you again for the final showcase of my stamp sets before the big reveal and forum party on the night of the 14th.
Before you leave which of the 4 cards is your fav?

Alli

Monday, January 11, 2010

Daily Designs and Daily Designs Sentiments Day 3

So are you ready for some more fun?  I have three cards to share with you today and the best part is that each card uses different images.

Yesterday one of my clues said "a little bird told me"...well here's the bird, some leafy branches and a "just a note" sentiment.  I began by stamping the bird in enchanted evening ink.  I wiped off the branch with a baby wipe and coloured it with a brown Tombo marker.  Then I stamped the sentiment "just a note".  Next I stamped the leafy branch 3 times across the paper and coloured it.  I added several layers of patterned paper, some ribbon and some buttons and finished it off with a scallop punch and a corner punch.


Stamp Set(s):  Daily Designs and Daily Designs Sentiments (Urban Design by Alli Miles) by PTI
Cardstock: Stamper's Select White by PTI, Spring Moss by PTI, Enchanted Evening by PTI
Patterned Paper: Bitty Dot by PTI
Ink: True Black by PTI, Enchanted Evening by PTI
Accents: Spring Moss Buttons by PTI, Swiss Dot Enchanted Evening Ribbon by PTI
Tools: Copic Ciao markers, Fiskars scallop punch, Tombo Markers (to colour the branch), Corner Rounder by EK Success


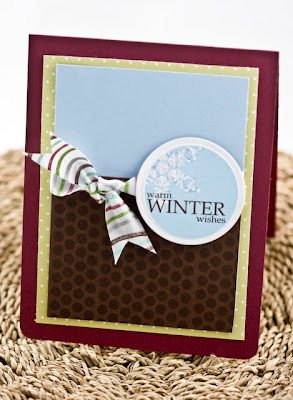
Even though I am sure some of you are tired of the winter, it's always nice to receive a special card not to mention send one to a friend or family member.  The sentiment "warm winter wishes" will certainly brighten anyone's days!

I began by inking up my circle snowflake image using Spring Rain ink.  Next, I stamped my "warm winter wishes" sentiment using dark chocolate ink.  Then I punched it out using the circle nestabilities by Spellbinders.  Once the image was prepared I added stickles to the snowflake and set it aside to dry.  Then I prepared my layers.  I stamped the dark chocolate with Polka Dot Basics II using dark chocolate ink. I layered the remaining papers, tied a piece of American Crafts shimmery ribbon (my colour inspiration) and placed my focal image on pop dots.


Stamp Set(s):  Daily Designs and Daily Designs Sentiments (Urban Design by Alli Miles) by PTI , Polka Dot Basics II by PTI
Cardstock: Stamper's Select White by PTI, Dark Chocolate by PTI, Scarlet Jewel by PTI, Spring Rain by PTI
Patterned Paper: Bitty Dot by PTI
Ink: Dark Chocolate by PTI, Spring Rain by PTI
Accents: Ribbon by American Crafts
Tools: Corner Rounder by EK Success


As you know every release day so far I have revealed some clues about the set.  Well today I have no words to share...instead I thought I'd show you the heart strings image.  What do you think?  *wink*

I began my card by stamping the focal image in true back.  Next I punched the image using the circle nestabilities by Spellbinder.


Next, I inked my sentiment in pure poppy and re-inked "sweet" in pure black (you could also use the black Tombo marker).  Then I coloured the "strings" of the heart using a few different shades of red Copic markers.  Then I painted the "wings" with stickles.  I also stamped a strip of dark chocolate using Polka Dot Basics II using dark chocolate ink.


As a final touch I edged the card using the vintage touch tea dye duo: chamomile and chai blend and used the corner rounder on the bottom of the card.


Stamp Set(s):  Daily Designs and Daily Designs Sentiments (Urban Design by Alli Miles) by PTI , Polka Dot Basics II by PTI
Cardstock: Stamper's Select White by PTI, Dark Chocolate by PTI, Kraft by PTI
Ink: Dark Chocolate by PTI, Pure Poppy by PTI, True Black by PTI

Accents: Swiss Dot Ribbon by PTI, Stickles

Tools: Corner Rounder by EK Success, Martha Stewart Punch, Cuttlebug and swiss dot embossing folder, Copic Markers, Circle nestabilities by Spellbinders


Thanks SO much for stopping by today.  Make sure to drop me a note and let me know which 1 out of the 3 cards you like the best.

See you again tomorrow...

Alli

Sunday, January 10, 2010

Daily Designs and Daily Designs Sentiments Day 2

Can you believe it's already the second day of sneak peaks!  I am really excited about sharing today's cards.  Both of the cards have some of my fav images and sentiments.

As many of you know, I moved to a new house and new location just over 7 months ago so the first image is a dear one.  It's a perfect image for moving or simply sending a note to a friend or parent.  I don't know about you, but my best friend's parents are like second parents to me.  Ellen and I have been best friends since I was in 3rd grade...almost 25 years ago.  So you can imagine when I visit her parents it's "home sweet home".  This sentiment is perfect after a visit with your parents too.  Or perhaps you want to send a piece of home to your husband/wife who is fighting the war overseas.  Whatever the occasion, you'll soon fall in love with this image paired with this sentiment.

CARD #1


I began stamping various paper scraps with coordinating ink using Polka Dot Basics II.  Each colour has the same polka dot pattern.  I then used my EK success square punch and punched out 2 or 3 or each colour and then randomly placed them on my card base.  The goal was to create a masculine/neutral tapestry or quilt look as a second layer.  Next I inked up my scallop circle (yes those rings and scallop are ONE stamp).  Then I stamped my birdhouses.  The birdhouses are also one stamp.  As a final step I coloured my image using Ciao Copic markers and stamped my sentiment on a scrap piece of white cardstock.  You can see the exact colours on the last photo.  I picked them to match my papers. *Note: the green in the ring is actually the same colour as my cardstock but looks lighter in the photo.


Stamp Set(s):  Daily Designs and Daily Designs Sentiments (Urban Design by Alli Miles) by PTI
Cardstock: Stamper's Select White by PTI, Dark Chocolate by PTI, Kraft, Scarlet Jewel by PTI, Ocean Tides by PTI
Ink: Scarlet Jewel by PTI, Dark Chocolate by PTI, New Leaf by PTI, Versamark, Ocean Tides by PTI
Tools: Circle Nestabilities by Spellbinders, Copic Ciao markers, EK Success square punch 11/4 inch


Another one of my fav images is this sweet teddy bear and rattle.  Who doesn't like making baby cards?

CARD #2


I began by stamping my bear on Dark Chocolate ink.  Next, I carefully wiped the rattle and nose using a baby wipe and coloured those areas with my Tombo markers and stamped it on white cardstock.  I touched up the inked area by going over the areas using my markers again (this helps the colours look more vibrant).  Then I stamped my "sweet baby" sentiment using spring rain just below the bear.  Next I inked my scallop circle using true black ink and wiped the outer ring with a baby wipe and coloured it with my blue tombo marker.  Again I touched it up after I stamped it.  Then I used my EK success scallop punch to punch out the image.
You'll note that I stamped Polka Dot Basics II on the spring rain cardstock.  I also used a Martha Stewart punch on the top edge.  I found a piece of Bitty Dot paper and decided to sew 3 button to it.  As a final touch I added some spring rain gingham ribbon and tied a bow.


As you probably noted, I used 3 different methods of "colouring" these images with 1)  ink 2)  Copics and 3) Tombo markers (SU! markers work just as well).  Again, I wanted you to see that there are many ways you can personalize your images.

Stamp Set(s):  Daily Designs and Daily Designs Sentiments (Urban Design by Alli Miles) by PTI
Cardstock: Stamper's Select White by PTI, Dark Chocolate by PTI, Spring Rain by PTI
Patterned Paper: Bitty Dot by PTI
Ink: Dark Chocolate by PTI, True Black by PTI, Spring Rain by PTI
Accents: Spring Rain Gingham by PTI, Spring Rain Buttons by PTI, White Floss
Tools: Copic Ciao markers, Martha Steward punch, EK Success scallop punch, Tombo Markers


Thanks so much for stopping by and to those who left me comments yesterday--it means so much to me.  I'd love to hear which card is your fav.

Your exclusive insider stamp set clues today just because you stopped by: you'll love this set if you want to crown your princess or hand a wrench to him...a little birdie told me! (3 images included in the set)

See you back again tomorrow!

Alli

Saturday, January 9, 2010

Introducing Daily Designs and Sentiments

Some of the best used stamp sets in my collection are versatile sets with every day occasions and sentiments.  Daily Designs is a set of all occasion images that can be used in conjunction with Daily Designs sentiments.  Did I mention they have also been created for tags?  Yes, like the previously released PTI tag sets, this set features circular images with an average of 1 3/4' in diameter--which perfectly coordinate with your Marvy punches in addition to your circular nestabilities by Spellbinders. I know many of you PTI stampers have been waiting for an all occasion set, just wait until you see the full reveal.  As you have graciously stopped by today I will share that this set includes something for dad, mom, baby, boy and girl.  I'll be sure to give you a few more clues tomorrow too so make sure to stop by.  These images and sentiments will be available Jan 15th!

Today's card features one of my favourite images--a cross-stitch heart, circle--a cross stitch circle and "stitched with love" sentiment.  Just imagine stitching this image with thread!  How fun would that be?


I began my card by stamp the "x" circle with Spring Moss ink on Stamper's Select White cardstock.  Next I stamped my "x" heart using Pure Poppy ink.  Then I stamped the sentiment using Dark Chocolate ink.  Then I used my circle nestability and created a deboss look (it popped the image down).  Then I used my Martha Stewart punch to create a decorative design on the Bitty Dot patterned paper.  As a final touch I added the Pure Poppy stitched ribbon.  You'll notice I raised the second layer with pop dots.


Stamp Set(s):  Daily Designs and Daily Designs Sentiments (Urban Design by Alli Miles) by PTI
Cardstock: Stamper's Select White by PTI
Patterned Paper: Bitty Dot by PTI
Ink: Pure Poppy by PTI, Dark Chocolate by PTI, Spring Moss by PTI
Accents: Pure Poppy stitched ribbon

Tools: Circle Nestabilities by Spellbinders, Martha Stewart Punch


Thanks so much for stopping by today.  I'd love to hear from you too!

Alli


P.S. I'll try and pry myself away from green and red...must have been all those Christmas cards I was making the past few months...

Thursday, January 7, 2010

January PTI sneak peak

Just wanted to let you know it is just about countdown time and Nichole has just revealed one of the images from my newest set!


Hugs,
Alli