Wednesday, May 12, 2010

Tuesday, May 11, 2010
Take Three: Summer Day 3
I just wanted to sincerely thank you so much for your comments! They mean so much to me. Can you believe we are already on day 3 of the release?!
I'm not sure about you, but I always watch PTI releases with baited breath. The team, illustrators and Nichole do an amazing job showcasing the new sets and supplies being released each month. I feel so honoured to be a part of such an amazing company. I remember when I first joined PTI in 2008 and the excitement I had for my first release month. Would you believe I still get just as giddy? There is nothing like receiving my stamp set and pealing off each stamp and FINALLY stamping each and everyone of them.
Pastel Floral Goodbye
I often sketch many of my card/project layouts before I receive my stamp set. And while I have a "game plan" sometimes I take a detour. About a week ago, I was oogling Lisa Johnson's projects (she is an amazing Paper Crafter isn't she?) and I stumbled upon a cute layout and colour combo I couldn't resist. Lisa created a card for the Sign Language release that I just fell in love with. I decided to create a card using the same layout and colour palette and change up the 1) ribbon 2) stamp set in addition to a few other things (impression plate, embossing, patterned paper).
Step 1: Create card base. Cut layers and use the impression template to add texture to the Aqua Mist layer.Round corners.
Step 2: Stamp flower images using VersaMark ink on patterned paper. Pour emboss powder and heat. Use die cut to cut out images.
Step 3: Stamp sentiment using Dark Chocolate ink. Adhere ribbon.
Step 4: Adhere all layers.


SUPPLIES
Stamp Set(s): Take Three: Summer (Urban Design by Alli Miles) PTI
Cardstock: Spring Moss by PTI, Aqua Mist by PTI, Melon Berry by PTI, Stamper's Select White by PTI
Ink: Dark Chocolate by PTI, VersaMark by Tsukineko, Chamomile by PTI
Accent: Ribbon by PTI, Espresso Emboss Powder
Tools: Tin Types Impression Plate by PTI, Scallop die by Papertrey Ink , Nestabilities by Spellbinders, Corner Chomper by We R Memory Makers
Missing You
There is nothing like a bright and cheerful card to brighten your day when you miss someone. I love the crisp white contrasted by the Hawaiian shores. My favourite part is the edging of Hawaiian shores against all the white. It makes the image and sentiment pop!
Step 1: Use the impression template to add texture to card base and second layer. Using die cut create an opening in second layer.
Step 2: Stamp bird images using Hawaiian Shores. Touch the centers of the flowers using a silver spica pen. Punch out using square punch. Round corners.
Step 3: Adhere ribbon to top layer. Stamp sentiment.
Step 4: Round selected card edges.
Step 5: Adhere all layers.


SUPPLIES
Stamp Set(s): Take Three: Summer (Urban Design by Alli Miles) PTI
Cardstock: Hawaiian Shores by PTI, Stamper's Select White by PTI
Ink: Hawaiian Shores by PTI
Accent: Ribbon by PTI
Tools: Tin Types Impression Plate by PTI, Nestabilities by Spellbinders, Corner Chomper by We R Memory Makers, Spica Pen by Copic
Floral Celebrations
I don't often use black cardstock for the card base but sometimes it merits the use. When I coloured my flower using Copics (R0000, RV29, R59) (YG63, G0000, YG13) and a white gel pen it just screamed being the center of attention.
Step 1: Create card base and create an opening using a die cut.
Step 2: Stamp circles using Snow Cap. Colour the circles using a water pen and ink (see photos below) You'll note I just pressed the ink pad to the top of the cover. It is easily wiped off.


Step 3: Colour flower image using Copic markers. Highlight flower petals with white gel pen. Adhere to card.
Step 4: Stamp sentiment using Snow Cap and attach ribbon.


SUPPLIES
Stamp Set(s): Take Three: Summer (Urban Design by Alli Miles) PTI, Polka Dot Basics by PTI
Cardstock: True Black by PTI, Stamper's Select White by PTI
Ink: Snow Cap by PTI, True Black by PTI
Accent: Ribbon by PTI
Tools:Nestabilities by Spellbinders, Corner Chomper by We R Memory Makers, Copic Markers, Aqua Pen, White Gel Pen
Thanks again for stopping by today! I'd love to hear from you and don't forget there are still 2 more days of sneak peaks before Take Three: Summer is released.
Alli
I'm not sure about you, but I always watch PTI releases with baited breath. The team, illustrators and Nichole do an amazing job showcasing the new sets and supplies being released each month. I feel so honoured to be a part of such an amazing company. I remember when I first joined PTI in 2008 and the excitement I had for my first release month. Would you believe I still get just as giddy? There is nothing like receiving my stamp set and pealing off each stamp and FINALLY stamping each and everyone of them.
Pastel Floral Goodbye
I often sketch many of my card/project layouts before I receive my stamp set. And while I have a "game plan" sometimes I take a detour. About a week ago, I was oogling Lisa Johnson's projects (she is an amazing Paper Crafter isn't she?) and I stumbled upon a cute layout and colour combo I couldn't resist. Lisa created a card for the Sign Language release that I just fell in love with. I decided to create a card using the same layout and colour palette and change up the 1) ribbon 2) stamp set in addition to a few other things (impression plate, embossing, patterned paper).
Step 1: Create card base. Cut layers and use the impression template to add texture to the Aqua Mist layer.Round corners.
Step 2: Stamp flower images using VersaMark ink on patterned paper. Pour emboss powder and heat. Use die cut to cut out images.
Step 3: Stamp sentiment using Dark Chocolate ink. Adhere ribbon.
Step 4: Adhere all layers.


SUPPLIES
Stamp Set(s): Take Three: Summer (Urban Design by Alli Miles) PTI
Cardstock: Spring Moss by PTI, Aqua Mist by PTI, Melon Berry by PTI, Stamper's Select White by PTI
Ink: Dark Chocolate by PTI, VersaMark by Tsukineko, Chamomile by PTI
Accent: Ribbon by PTI, Espresso Emboss Powder
Tools: Tin Types Impression Plate by PTI, Scallop die by Papertrey Ink , Nestabilities by Spellbinders, Corner Chomper by We R Memory Makers
Missing You
There is nothing like a bright and cheerful card to brighten your day when you miss someone. I love the crisp white contrasted by the Hawaiian shores. My favourite part is the edging of Hawaiian shores against all the white. It makes the image and sentiment pop!
Step 1: Use the impression template to add texture to card base and second layer. Using die cut create an opening in second layer.
Step 2: Stamp bird images using Hawaiian Shores. Touch the centers of the flowers using a silver spica pen. Punch out using square punch. Round corners.
Step 3: Adhere ribbon to top layer. Stamp sentiment.
Step 4: Round selected card edges.
Step 5: Adhere all layers.


SUPPLIES
Stamp Set(s): Take Three: Summer (Urban Design by Alli Miles) PTI
Cardstock: Hawaiian Shores by PTI, Stamper's Select White by PTI
Ink: Hawaiian Shores by PTI
Accent: Ribbon by PTI
Tools: Tin Types Impression Plate by PTI, Nestabilities by Spellbinders, Corner Chomper by We R Memory Makers, Spica Pen by Copic
Floral Celebrations
I don't often use black cardstock for the card base but sometimes it merits the use. When I coloured my flower using Copics (R0000, RV29, R59) (YG63, G0000, YG13) and a white gel pen it just screamed being the center of attention.
Step 1: Create card base and create an opening using a die cut.
Step 2: Stamp circles using Snow Cap. Colour the circles using a water pen and ink (see photos below) You'll note I just pressed the ink pad to the top of the cover. It is easily wiped off.


Step 3: Colour flower image using Copic markers. Highlight flower petals with white gel pen. Adhere to card.
Step 4: Stamp sentiment using Snow Cap and attach ribbon.


SUPPLIES
Stamp Set(s): Take Three: Summer (Urban Design by Alli Miles) PTI, Polka Dot Basics by PTI
Cardstock: True Black by PTI, Stamper's Select White by PTI
Ink: Snow Cap by PTI, True Black by PTI
Accent: Ribbon by PTI
Tools:Nestabilities by Spellbinders, Corner Chomper by We R Memory Makers, Copic Markers, Aqua Pen, White Gel Pen
Thanks again for stopping by today! I'd love to hear from you and don't forget there are still 2 more days of sneak peaks before Take Three: Summer is released.
Alli
Monday, May 10, 2010
Take Three: Summer Day 2
Welcome back to day two of peaks from my newest set Take Three: Summer which will be available from Papertrey Ink on May 15th. I'm not sure about you, but I have been surrounded by sunshine, green leaves, flower blossoms and warm air for the last few weeks and it has put me into summer mode. I love lazy summer days where I can kick back with flip flops, tees and capris and enjoy the day for all it has to offer. I love the sound of the birds chirping, the lawn mowers going and the smell of BBQs cooking something delicious. I am an avid gardener and so the prospect of creating my own oasis came true last year. If you followed me last year you know I took a BIG break from blogging so that I could begin my dream of creating a yard HERE, HERE, HEREhttp://allistamps.blogspot.com/2009/07/birthday.html, HERE. It was truly that experience that inspired me to create a series of stamps for all seasons. I love the changes each of those season's brings with them. I am fortunate that my stamp room faces the front yard and I can watch "nature at work" and be inspired!
The Details
There is nothing more exciting than a splash of colour and a fun layout. I absolutely love mixing bright trendy colours together. I also enjoy using "oldies but goodies" from time to time. I adore shrinky dinks. There is something so fun about stamping images/sentiments on shrinky dinks and heating them until they shrink to 1/2 the size. They are just TOO CUTE! I like using shrinky dinks as fun accents on cards but also as focal jewelery pieces too. Because the rounded square images are larger I like the ability of changing their size and as a result decided to create a card using them.
Step 1: Use the impression template to add texture to card base.
Step 2: Stamp bird images and sentiment using StazOn on clear shrinky dinks. Punch out using square punch. Heat for 2 minutes and let cool.
Step 3: Using scallop nestabilities cut out felt and Raspberry Fizz cardstock. Using scallop die cut, create a scalloped edge using True Black cardstock.
Step 4: Stamp Spring Moss cardstock with flower image using Ripe Avocado ink.
Step 5: Cut a strip of ribbon and a strip of kraft cardstock. Adhere all layers and attach ribbon and shrinky dinks.


SUPPLIES
Stamp Set(s): Take Three: Summer (Urban Design by Alli Miles) PTI
Cardstock: Kraft by PTI, Hawaiian Shores by PTI, True Black by PTI, Raspberry Fizz by PTI, Spring Moss by PTI
Ink: Ripe Avocado by PTI, Jet Black StazOn by Tsukineko
Accent: Velvet Ribbon by PTI, clear Shrinky Dinks
Tools: Nestabilities by Spellbinders, Scallop die by Papertrey Ink , Tin Types impression template by PTI, Square Punch by EK Success
On YOUR Birthday
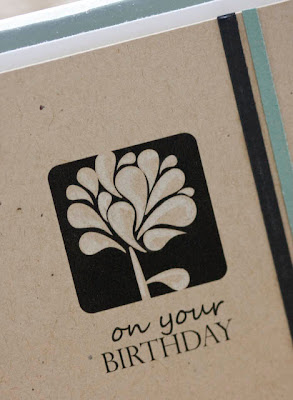
I strongly believe that less is more! You might notice that about my CAS style. "White" space can be intimidating but it is also liberating. This flower image has amazing potential. It can be coloured, it can be embossed, it can be sparkled and sprinkled. It can be outlined, cut out, flipped and raised. And while I have stamped it in colour, there is something absolutely stunning about it in black...especially against kraft and with a shade of white.
Step 1: Cut a card base measuring 4x4 from a clear sheet. Cut a 4x4 layer of Ocean Tides, 3.75x3.75 of Stamper's White cardstock and 3.5x3.5 of Kraft cardstock.
Step 2: Stamp flower image and sentiment using True Black.
Step 3: Shade white around one edge of each of the flower petals.
Step 4: Cut strips of True Black and Ocean Tides.
Step 5: Adhere all layers.
I have been creating clear cards for quite some time but Nichole created a fab video that gives some fab tips for creating clear cards HERE.


SUPPLIES
Stamp Set(s): Take Three: Summer (Urban Design by Alli Miles) PTI
Cardstock: Kraft by PTI, Ocean Tides by PTI, True Black by PTI, Stamper's Select White by PTI, Clear Sheet by PTI
Ink: True Black by PTI
Accent: White pencil
Thanks again for stopping by today! I'd love to hear from you and don't forget there are still 3 more days of sneak peaks.
Alli
The Details
- Cost: $15
- Take Three: Summer contains 12 images
There is nothing more exciting than a splash of colour and a fun layout. I absolutely love mixing bright trendy colours together. I also enjoy using "oldies but goodies" from time to time. I adore shrinky dinks. There is something so fun about stamping images/sentiments on shrinky dinks and heating them until they shrink to 1/2 the size. They are just TOO CUTE! I like using shrinky dinks as fun accents on cards but also as focal jewelery pieces too. Because the rounded square images are larger I like the ability of changing their size and as a result decided to create a card using them.
Step 1: Use the impression template to add texture to card base.
Step 2: Stamp bird images and sentiment using StazOn on clear shrinky dinks. Punch out using square punch. Heat for 2 minutes and let cool.
Step 3: Using scallop nestabilities cut out felt and Raspberry Fizz cardstock. Using scallop die cut, create a scalloped edge using True Black cardstock.
Step 4: Stamp Spring Moss cardstock with flower image using Ripe Avocado ink.
Step 5: Cut a strip of ribbon and a strip of kraft cardstock. Adhere all layers and attach ribbon and shrinky dinks.


SUPPLIES
Stamp Set(s): Take Three: Summer (Urban Design by Alli Miles) PTI
Cardstock: Kraft by PTI, Hawaiian Shores by PTI, True Black by PTI, Raspberry Fizz by PTI, Spring Moss by PTI
Ink: Ripe Avocado by PTI, Jet Black StazOn by Tsukineko
Accent: Velvet Ribbon by PTI, clear Shrinky Dinks
Tools: Nestabilities by Spellbinders, Scallop die by Papertrey Ink , Tin Types impression template by PTI, Square Punch by EK Success
On YOUR Birthday
I strongly believe that less is more! You might notice that about my CAS style. "White" space can be intimidating but it is also liberating. This flower image has amazing potential. It can be coloured, it can be embossed, it can be sparkled and sprinkled. It can be outlined, cut out, flipped and raised. And while I have stamped it in colour, there is something absolutely stunning about it in black...especially against kraft and with a shade of white.
Step 1: Cut a card base measuring 4x4 from a clear sheet. Cut a 4x4 layer of Ocean Tides, 3.75x3.75 of Stamper's White cardstock and 3.5x3.5 of Kraft cardstock.
Step 2: Stamp flower image and sentiment using True Black.
Step 3: Shade white around one edge of each of the flower petals.
Step 4: Cut strips of True Black and Ocean Tides.
Step 5: Adhere all layers.
I have been creating clear cards for quite some time but Nichole created a fab video that gives some fab tips for creating clear cards HERE.


SUPPLIES
Stamp Set(s): Take Three: Summer (Urban Design by Alli Miles) PTI
Cardstock: Kraft by PTI, Ocean Tides by PTI, True Black by PTI, Stamper's Select White by PTI, Clear Sheet by PTI
Ink: True Black by PTI
Accent: White pencil
Thanks again for stopping by today! I'd love to hear from you and don't forget there are still 3 more days of sneak peaks.
Alli
Sunday, May 9, 2010
Introducing Take Three: Summer
I am thrilled to share my newest release from the Urban Design collection called Take Three: Summer which will be available through Papertrey Ink on May 15th, 2010. If you missed the Take Three: Spring release, you may not know that "Take Three" is a series collection. And since you already know there is a Spring and Summer you can bet there will be a Fall and Winter too!
I am so excited to share the two focal images in Take Three: Summer stamp set. Don't forget, there are three different images of each to choose from too so you can mix and match, flip and turn them as much as you like to make a unique card.
CONGRATulations Flower Trio
The first card not only has a simple layout but is also simple to create. I just love the colour combo--so fresh for a summer's day! Not to mention the flower is one of my fav designs in the entire collection! I used all three flowers in this stamp set. This congratulations card could be given as an end of the school year card, for a job promotion, or for someone who is expecting.
Step 1: Stamp flower images using Raspberry Fizz ink on Stamper's select white. Tip: draw two fine lines using a ruler to create even spacing of images.
Step 2: Stamp the congratulations sentiment using True Black ink.
Step 3: Using the scallop die cut, cut a scalloped edge using True Black cardstock.
Step 4: As a final touch add the gingham ribbon, round the corners on the card base and adhere all layers.

SUPPLIES
Stamp Set(s): Take Three: Summer (Urban Design by Alli Miles) PTI
Cardstock: Stamper's Select White by PTI, Raspberry Fizz by PTI, True Black by PTI
Ink: True Black by PTI, Raspberry Fizz by PTI
Accent: Gingham Ribbon by PTI
Tools: Scallop die by PTI
BIRD's Eye View Friendship
The second card was created using one of the bird images from this set. I like the ability to mix and match birds or choose just one as a focal image. Besides, when you add colour it changes the look anyways :) You'll note that I stamped the bird image in three colours but also coloured the eye black using a marker.
Step 1: Stamp bird image using New Leaf, Scarlet Jewel and Spring Rain. Tip: draw two fine lines using a ruler to create even spacing of images.
Step 2: Stamp the wonderful friend sentiment using True Black ink.
Step 3: Cut several layered pieces of cardstock.
Step 4: As a final touch add the saddlestitch ribbon (button the bottom in v-shape), cardstock threaded button and adhere all layers.

SUPPLIES
Stamp Set(s): Take Three: Summer (Urban Design by Alli Miles) PTI
Cardstock: Stamper's Select White by PTI, Spring Rain by PTI, True Black by PTI, New Leaf by PTI, Scarlet Jewel by PTI
Ink: Spring Rain by PTI, True Black by PTI, New Leaf by PTI, Scarlet Jewel by PTI
Accent: Saddle Stitch Ribbon by PTI, True Black button by PTI
Thank you for stopping by today! I'd love to hear from you and don't forget there will be sneak peaks all week long (May 10-15).
Hugs;
Alli
I am so excited to share the two focal images in Take Three: Summer stamp set. Don't forget, there are three different images of each to choose from too so you can mix and match, flip and turn them as much as you like to make a unique card.
CONGRATulations Flower Trio
The first card not only has a simple layout but is also simple to create. I just love the colour combo--so fresh for a summer's day! Not to mention the flower is one of my fav designs in the entire collection! I used all three flowers in this stamp set. This congratulations card could be given as an end of the school year card, for a job promotion, or for someone who is expecting.
Step 1: Stamp flower images using Raspberry Fizz ink on Stamper's select white. Tip: draw two fine lines using a ruler to create even spacing of images.
Step 2: Stamp the congratulations sentiment using True Black ink.
Step 3: Using the scallop die cut, cut a scalloped edge using True Black cardstock.
Step 4: As a final touch add the gingham ribbon, round the corners on the card base and adhere all layers.

SUPPLIES
Stamp Set(s): Take Three: Summer (Urban Design by Alli Miles) PTI
Cardstock: Stamper's Select White by PTI, Raspberry Fizz by PTI, True Black by PTI
Ink: True Black by PTI, Raspberry Fizz by PTI
Accent: Gingham Ribbon by PTI
Tools: Scallop die by PTI
BIRD's Eye View Friendship
The second card was created using one of the bird images from this set. I like the ability to mix and match birds or choose just one as a focal image. Besides, when you add colour it changes the look anyways :) You'll note that I stamped the bird image in three colours but also coloured the eye black using a marker.
Step 1: Stamp bird image using New Leaf, Scarlet Jewel and Spring Rain. Tip: draw two fine lines using a ruler to create even spacing of images.
Step 2: Stamp the wonderful friend sentiment using True Black ink.
Step 3: Cut several layered pieces of cardstock.
Step 4: As a final touch add the saddlestitch ribbon (button the bottom in v-shape), cardstock threaded button and adhere all layers.

SUPPLIES
Stamp Set(s): Take Three: Summer (Urban Design by Alli Miles) PTI
Cardstock: Stamper's Select White by PTI, Spring Rain by PTI, True Black by PTI, New Leaf by PTI, Scarlet Jewel by PTI
Ink: Spring Rain by PTI, True Black by PTI, New Leaf by PTI, Scarlet Jewel by PTI
Accent: Saddle Stitch Ribbon by PTI, True Black button by PTI
Thank you for stopping by today! I'd love to hear from you and don't forget there will be sneak peaks all week long (May 10-15).
Hugs;
Alli
Saturday, May 8, 2010
Thanks.
It's almost countdown at Papertrey Ink! Are you getting excited yet? I know I am. I can't wait for you to see some of the fun designs included in my new set. Don't forget to come back tomorrow night for your first sneak peak.
While you wait for the new stuff I have a textured card to share. There is something about circles that I just love so you'll see lots on this card from pindot to polka dot!

SUPPLIES
Stamp Set(s): sentiment from Daily Designs Sentiments from PTI, Polka Dot Basics II by PTI
Cardstock: Vintage Cream by PTI, Spring Moss by PTI, Aqua Mist by PTI
Other: book paper
Ink: True Black by PTI, New Leaf by PTI
Accents: Ribbon by PTI, Leaf Trinket Pin by Maya Road, Flowers by Prima, Buttons by PTI
Tools: Cuttlebug embossing folders (positive and negative of Pindot), Crop-a-dile corner rounder, flower die cut, Scallop punch by EK Success
Hope you have some time to get out and enjoy the weekend. Our local forecast shows sun and warm temperatures so I will likely be out in the yard in between some stamping sessions of course!
Alli
While you wait for the new stuff I have a textured card to share. There is something about circles that I just love so you'll see lots on this card from pindot to polka dot!

SUPPLIES
Stamp Set(s): sentiment from Daily Designs Sentiments from PTI, Polka Dot Basics II by PTI
Cardstock: Vintage Cream by PTI, Spring Moss by PTI, Aqua Mist by PTI
Other: book paper
Ink: True Black by PTI, New Leaf by PTI
Accents: Ribbon by PTI, Leaf Trinket Pin by Maya Road, Flowers by Prima, Buttons by PTI
Tools: Cuttlebug embossing folders (positive and negative of Pindot), Crop-a-dile corner rounder, flower die cut, Scallop punch by EK Success
Hope you have some time to get out and enjoy the weekend. Our local forecast shows sun and warm temperatures so I will likely be out in the yard in between some stamping sessions of course!
Alli
Tuesday, May 4, 2010
May PTI preview
Just a quick note today as I am excited to share a preview of my Urban Design release for May! Make sure you pop by during the countdown (May 10-15) as I will have lots of sneak peaks using my new.
Make sure to pop by Nichole's blog for all the deets about this month's releases by PTI.

Have a terrific day!
Alli
Make sure to pop by Nichole's blog for all the deets about this month's releases by PTI.

Have a terrific day!
Alli
Monday, May 3, 2010
Neighbours.
Wow, it's been a week since I last posted! As you know I was away for most of last week at a homeschool convention picking next year's curriculum for my son and familiarizing myself with the latest and greatest teaching tools. I can't wait to start planning everything and teaching all these fab new lessons.
Our neighborhood is growing (new houses are being built) and a family that moved in last November who was renting to own finally bought the house. I thought it would be wonderful gift to bring them some baked goods and a card to welcome them to the neighbourhood. I am not sure about you, but our neighbours are very important to us. We like to get to know the people who surround us and often form friendships with them. We have already had many of the neighbours over for supper--those are our favourite events!! In fact, we are hoping to host a neighbourhood BBQ in the middle of the summer too. Our neighbours range in ages and knowledge. It's always fun to learn new things from them and to teach our children that people in our community are important too. After all it takes a community to raise a child and why not instill these morals and values in our children now.

SUPPLIES
Stamp set(s): Daily Designs and Daily Designs Sentiments
Cardstock: Dark Chocolate by PTI, Vintage Cream by PTI
Ink: Dark Chocolate by PTI
Accents: Ribbon by PTI
Tools: Cuttlebug Emboss Folder, Nestabilities by Spellbinders, Scallop Punch by Ek Success, Copic Markers
Have a super Monday!
Alli
Our neighborhood is growing (new houses are being built) and a family that moved in last November who was renting to own finally bought the house. I thought it would be wonderful gift to bring them some baked goods and a card to welcome them to the neighbourhood. I am not sure about you, but our neighbours are very important to us. We like to get to know the people who surround us and often form friendships with them. We have already had many of the neighbours over for supper--those are our favourite events!! In fact, we are hoping to host a neighbourhood BBQ in the middle of the summer too. Our neighbours range in ages and knowledge. It's always fun to learn new things from them and to teach our children that people in our community are important too. After all it takes a community to raise a child and why not instill these morals and values in our children now.

SUPPLIES
Stamp set(s): Daily Designs and Daily Designs Sentiments
Cardstock: Dark Chocolate by PTI, Vintage Cream by PTI
Ink: Dark Chocolate by PTI
Accents: Ribbon by PTI
Tools: Cuttlebug Emboss Folder, Nestabilities by Spellbinders, Scallop Punch by Ek Success, Copic Markers
Have a super Monday!
Alli
Subscribe to:
Posts (Atom)